OBIEE ADMINISTRATION TOOL
OBIEE Administration tool is a windows based client tool used to develop and manage the semantic layer (Repository). Semantic layer is also called as metadata layer (Data about data - for example Table Names, View names, Stored Procedure names, Column names, column data types, column size ...etc).
Semantic layer is called
- as Universe in SAPBO
- as Model or Cognos project file (.cpf file) in Cognos.
- as Repository (.rpd extension ) in OBIEE.
To build a repository or RPD we need to complete below three steps:
1. Creating Physical layer.
2. Creating Business Model and Mapping (BMM) layer.
3. Creating Presentation layer
Starting OBIEE Admin Tool:
Windows Menu : Start > All Programs > Oracle Business Intelligence > BI Administration
How to create repository (RPD) file and importing metadata:
Go to file menu > new repository.
1.) On First Screen (Repository Information):

 RPD File Location:
Generally rpd files created by OBIEE Admin tool are present inside at below location:
<FMW_HOME>\instances\instance1\bifoundation\OracleBIServerComponent\coreapplication_obis1\repository
For Example :
C:\app\Manish\product\11.2.0\OBIEE11.1.1.6.0\instances\instance1\bifoundation\OracleBIServerComponent\coreapplication_obis1\repository
2.) On Second Screen (Select Data Source):

3.) On Third Screen (Select Metadata Types):
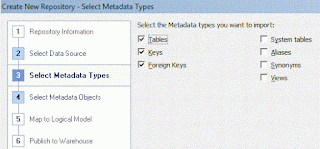
 While importing metadata if foreign key checkbox is selected its automatically creates the joins. Deselecting the foreign key checkbox while importing metadata will not create the joins in physical layer in rpd (semantic layer). These joins can later created using Join tool in obi admin tool.
 Stored Procedure is not available here, We will be discussing it later.
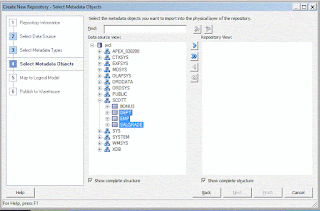
4.) On Fourth Screen (Select Metadata Objects):
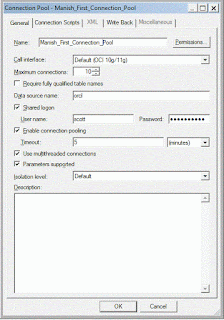
It then opens another Dialogue Box, where you need to enter the name of your Connection Pool.
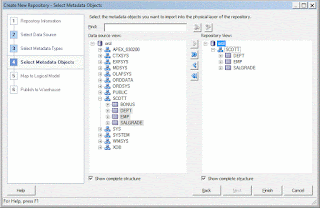
Imported tables etc now started looking into Repository View. Expend the Schema (Scott) and you should be able to see the tables.
1. Physical layer.
2. Business Model and Mapping (BMM) layer.
3. Presentation layer

 Sometimes in rpd > when in physical layers > Try to View data > and you are unable to see data or got message table does not exists that could be due to user used in connection pool is having permission to query data or not.
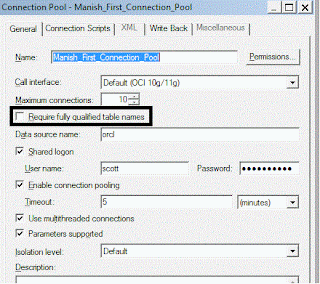
Also it could be because of missing prefix schemaname in select query. To get this done go to > Connection pool properties > check required fully qualified table name check box.
OBIEE Administration tool is a windows based client tool used to develop and manage the semantic layer (Repository). Semantic layer is also called as metadata layer (Data about data - for example Table Names, View names, Stored Procedure names, Column names, column data types, column size ...etc).
Semantic layer is called
- as Universe in SAPBO
- as Model or Cognos project file (.cpf file) in Cognos.
- as Repository (.rpd extension ) in OBIEE.
To build a repository or RPD we need to complete below three steps:
1. Creating Physical layer.
2. Creating Business Model and Mapping (BMM) layer.
3. Creating Presentation layer
Starting OBIEE Admin Tool:
Windows Menu : Start > All Programs > Oracle Business Intelligence > BI Administration
How to create repository (RPD) file and importing metadata:
Go to file menu > new repository.
1.) On First Screen (Repository Information):
- Name : Manish_First_RPD
- Repository password: Admin123
(Alphanumeric and minimum length should be 8 characters) - Retype password: Admin123
- Leave all other values as default given in the below screenshot and click on next

Generally rpd files created by OBIEE Admin tool are present inside at below location:
<FMW_HOME>\instances\instance1\bifoundation\OracleBIServerComponent\coreapplication_obis1\repository
For Example :
C:\app\Manish\product\11.2.0\OBIEE11.1.1.6.0\instances\instance1\bifoundation\OracleBIServerComponent\coreapplication_obis1\repository
2.) On Second Screen (Select Data Source):
- Select Connection type: OCI 10g/11g
- Data source name: ORCL
- User name: scott
- Password: tiger
- Click on next

3.) On Third Screen (Select Metadata Types):
- Select tables, keys, foreign keys

4.) On Fourth Screen (Select Metadata Objects):
- Select the Schema (user) and tables you want to use in repository.
- Click on Import Selected (>) button

It then opens another Dialogue Box, where you need to enter the name of your Connection Pool.
- Enter the Name of Connection Pool Name: Manish_First_Connection_Pool
- Click OK.

Imported tables etc now started looking into Repository View. Expend the Schema (Scott) and you should be able to see the tables.

- Click on Finish.
1. Physical layer.
2. Business Model and Mapping (BMM) layer.
3. Presentation layer

Also it could be because of missing prefix schemaname in select query. To get this done go to > Connection pool properties > check required fully qualified table name check box.


No comments:
Post a Comment