Sunday, 6 December 2015

TRAINING (OBI-4) - OBIEE ADMIN TOOL - Part2 (Building Physical Layer)


PHYSICAL LAYER

  • Is First layer in the repository development.
  • Defines the data sources to which Oracle BI Server submits queries.
  • The data sources can be of the same or different varieties.
  • There can be one or more data sources in the Physical layer, including databases, flat files, XML documents.
  • You can import schemas or portions of schemas from existing data sources.
  • You can also create objects in the Physical layer manually.
  • When you import metadata, many of the properties of the data sources are configured automatically based on the information gathered during the import process.
  • After import, you can also define other attributes of the physical data sources, such as join relationships, that might not exist in the data source metadata.

Physical Layer Objects


1.) Database


  • Highest/top level object in Physical layer.
  • Defines the data sources to which Oracle BI Server submits queries.

2.) Connection Pool 


  • Defines how Oracle BI Server connects to a data source.
  • Specifies the ODBC or native data source name. 
  • Allows multiple users to share a connection pool of data source connections.

3.) Schema Folders


  •  Optional display folder that contain tables & columns for a physical schema.
    • To create a schema folder, right click database object and select New Object > Physical Schema

4.) Physical Schema


  • Represent the actual DB user/Schema name

5.) Physical Table


  • An object that corresponds to a table in a physical data source.
  • Is typically imported from a database or other data sources.
  • Provides the metadata necessary for Oracle BI server to access the tables with SQL requests.
I.) Physical Table - Alias


    • A virtual physical table object that points to a physical table object.
o   Right Click physical table and Select New Object > Alias
o   Provide name for Alias table and Alias table will appear with an Alias icon in physical layer.

II.) Physical Table - Select Table Type 


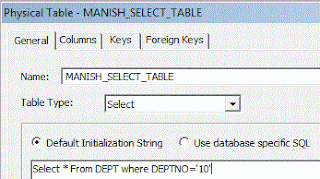
    • Specifies that a physical table object is a SELECT statement.
    • Select statement is called as OPAQUE VIEW.
    • If need a new table then go for the physical table or materialized view, in worst situation go for opaque view.

III.) Physical Table - View Deployment


    • Creates a corresponding database view for metadata views.

6.)  Physical Columns


  • An object that corresponds to a column in a physical database.

7.) Key Columns


  • Defines relationship between tables.
    • Primary Key:
      • Uniquely identifies a single row of data
      • Consists of a column or set of columns
      • Two or more columns acting as primary key then its called as COMPOSITE KEY
      • Is identified by a key icon
    • Foreign Key:
      • Refers to the primary key columns in another table
      • Consists of a column or set of columns
For faster execution its always a best practice to have key column in every table at Physical layer.  Also in OBIEE there is no forign key everything is a primary key.

How to build Physical Layer:
To build the Physical layer of a repository, you need to perform following steps:

1.) Create a New Repository
Already covered in - TRAINING (OBIEE-3) present @
http://technochanakya.blogspot.in/2015/12/training-obiee-3-obiee-admin-tool-part1.html

2.) Import Metadata
Already covered in - TRAINING (OBIEE-3) present @
http://technochanakya.blogspot.in/2015/12/training-obiee-3-obiee-admin-tool-part1.html

3.) Verify Connection
Refer above notes.

4.) Create Aliases
Refer above notes.

5.) Create Physical Keys and Joins
A relationship between tables is called as JOIN. In OBI Admin tool's Physical Layer, Joins represent Primary Key- Foreign Key relationship between tables.

Database Level Joins (5 types of joins in general):
1.) Equi Join
2.) Non Equi Join
3.) Outer Join(left, right, full)
4.) Self Join
5.) Cross Join
  
OBIEE (11g) Level Joins (3 types of joins in general):
1.) Foreign Key Join
> Equivalent to Equi Join @ DB Level
> Accepts only = operator
> Most used join in physical layer
2.) Complex Join
> Equivalent to Non Equi Join @ DB Level
> Accepts all operators like (=,<>,=>,,=…….etc)
> Less used join in Physical layer
3.) Logical Join
> Equivalent to Outer Join(left, right, full) @ DB Level
> BMM layer Join is called as Logical Join
> In OBIEE 10G it is also called as Complex Join

Other DB Joins in OBIEE (11g)
Self Join 
> Using Alias (in Physical Layer)
Cross Join
>Not supported by any BI tool


How to view existing joins in Physical Layer:
If Joins are imported due to relationship defined at database level, you could view these joins following below steps:

In physical layer select schema object (scott) > click on physical diagram icon  on toolbar
OR
In physical layer select schema object (scott) > right click on physical diagram > objects and all joins

You should now be able to see the joins created due to relationship imported at database level.


How to create Foreign Key (Equi) joins in Physical Layer: 
In physical layer select schema object (scott) > click on physical diagram icon  on toolbar > click on new join icon  on toolbar > Drag the Join Tool from EMP to DEPT table


While creating joins manually at physical layer we should always consider CARDINALITY (how relationship between tables eg; 1-To-1, Many-To-1, Many-To-Many). We should always start at MANY side and ends with ONE side, as this will improve the performance of sql.

How to create Complex (Non-Equi) joins in Physical Layer: 
In physical layer select schema object (scott) > click on physical diagram icon  on toolbar > click on new join icon  on toolbar >  Drag the Join Tool from EMP to SALGRADE table


Correct the Expression as sal>=losal and sal<=hisal and click OK.


Double click on the join arrow/line between EMP and SALGRADE table and you should now see the operator changed to COMPLEX and also expression must automatically converted to fully qualified name of database, schema etc.


Wednesday, 2 December 2015

TRAINING (OBI-3) - OBIEE ADMIN TOOL - Part1 (Create repository/rpd file and importing metadata)

OBIEE ADMINISTRATION TOOL

OBIEE Administration tool is a windows based client tool used to develop and manage the semantic layer (Repository). Semantic layer is also called as metadata layer (Data about data - for example Table Names, View names, Stored Procedure names, Column names, column data types, column size ...etc).

Semantic layer is called
- as Universe in SAPBO
- as Model or Cognos project file (.cpf file) in Cognos.
- as  Repository (.rpd extension ) in OBIEE.

To build a repository or RPD we need to complete below three steps:
1. Creating Physical layer.
2. Creating Business Model and Mapping (BMM) layer.
3. Creating Presentation layer

Starting OBIEE Admin Tool:
Windows Menu : Start > All Programs > Oracle Business Intelligence > BI Administration

How to create repository (RPD) file and importing metadata:

Go to file menu > new repository.

1.) On First Screen (Repository Information):
  • Name : Manish_First_RPD
  • Repository password: Admin123
    (Alphanumeric and minimum length should be 8 characters)
  • Retype password: Admin123
  • Leave all other values as default given in the below screenshot and click on next


 RPD File Location:
Generally rpd files created by OBIEE Admin tool are present inside at below location:

<FMW_HOME>\instances\instance1\bifoundation\OracleBIServerComponent\coreapplication_obis1\repository

For Example :
C:\app\Manish\product\11.2.0\OBIEE11.1.1.6.0\instances\instance1\bifoundation\OracleBIServerComponent\coreapplication_obis1\repository

2.) On Second Screen (Select Data Source):
  • Select Connection type: OCI 10g/11g
  • Data source name: ORCL
  • User name: scott
  • Password: tiger
  • Click on next


3.) On Third Screen (Select Metadata Types):
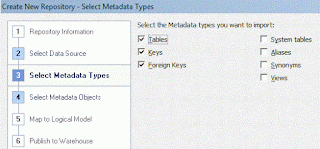
  • Select tables, keys, foreign keys


While importing metadata if foreign key checkbox is selected its automatically creates the joins. Deselecting the foreign key checkbox while importing metadata will not create the joins in physical layer in rpd (semantic layer). These joins can later created using Join tool in obi admin tool.

Stored Procedure is not available here, We will be discussing it later.

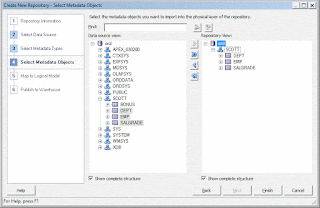
4.) On Fourth Screen (Select Metadata Objects):
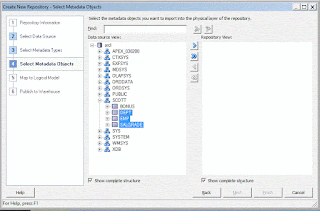
  • Select the Schema (user) and tables you want to use in repository.
  • Click on Import Selected (>) button


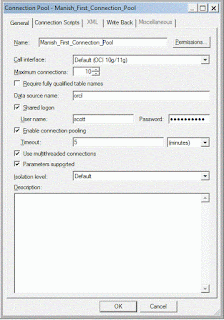
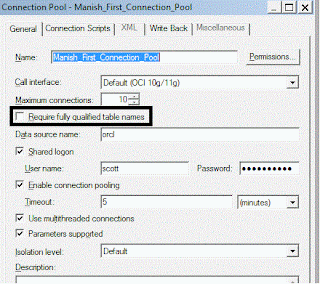
It then opens another Dialogue Box, where you need to enter the name of your Connection Pool.
  • Enter the Name of Connection Pool Name: Manish_First_Connection_Pool
  • Click OK.


Imported tables etc now started looking into Repository View. Expend the Schema (Scott) and you should be able to see the tables.


  • Click on Finish.
Once done your first rpd is created and in OBIEE Admin tool should be able to see all three layers in your rpd i.e.

1. Physical layer.
2. Business Model and Mapping (BMM) layer.
3. Presentation layer


Sometimes in rpd > when in physical layers > Try to View data > and you are unable to see data or got message table does not exists that could be due to user used in connection pool is having permission to query data or not. 

Also it could be because of missing prefix schemaname in select query. To get this done go to > Connection pool properties > check required fully qualified table name check box.


Tuesday, 1 December 2015

TRAINING (OBI-2) - DIFFERENCE BETWEEN OBIEE & OBIA


DIFFERENCE BETWEEN OBIEE & OBIA


Oracle Business Intelligence - Enterprise Edition (OBIEE)


Oracle Business Intelligence (OBI) is a technology platform that enables customers to make faster, more informed business decisions by offering best breed enterprise analytics solutions using interactive dashboards, powerful operational reporting, content and metadata search, native access to Big Data sources, sophisticated in-memory computing.

Below are some of the technology component of OBIEE.
  • Administration tool                              > Semantic layer
  • Answers(10g) or Analysis (11G)           > Reports
  • Dashboard                                          > Dashboards
  • Delivers                                              > scheduling reports
  • Job Manager                                       > To monitor scheduled reports
  • Catalog Manager                                 > Deploy (Dev to Test or Test to Prod)
  • ODBC Client                                        > to write and execute SQL
  • System Management (10G) or EM(11G)>To integrate and monitor server performance
  • WLS(11g) or IIS(10g) or OC4J (10g)    > Web Server
  • Console                                              > Security
  • BI publisher                                        > pixel formatting reports


Oracle Business Intelligence Applications (OBIA)

Oracle BI Applications (OBIA) are built on the Oracle BI Suite Enterprise Edition OBIEE. OBIA are prebuilt BI solutions designed for heterogeneous environments and to gain insight from a range of data sources and applications including Siebel, Oracle E-Business Suite, PeopleSoft, and third party systems such as SAP.

OBIA is a predefined work of ETL and Reporting. OBIA is bundled with predefined work like ETLs (SDE, SIL, mappings etc), Symantic layer (rpds), Dashboards & reports (Web Catalog). 

Below are the details and usage of prebuilt items which came delivered with OBIA application.
1.) SDE (Source Dependent Extraction) > OLTP to Staging Area
2.) SIL (Source Independent Loading)   > Staging Area to Data WareWarehouse
3.) DAC (DW Administration Console)   > Scheduling Tool of ETL (SDE & SIL)
4.) Pre Build Semantic Layer              > RPD
5.) Pre Build Reports & Pre Build Dasboards > Web Catalog
6.) OBAW (Oracle Business Analytics Warehouse) > Data Model (Set of tables around 950) 

Below are the list of some of the OBIA Product module offerings:

- Oracle Financial Analytics
- Oracle HR Analytics
- Oracle Marketing Analytics
- Oracle Order Management Fulfillment Analytics
- Oracle Vertical (Industry Specific) Analytics

Saturday, 14 November 2015

TRAINING (OBI-1) - HISTORY OF OBIEE

HISTORY OF OBIEE

The foundation stone of today's OBI product was laid down in 1997 by a company called nQuire, who developed the technology and tools commonly known as NQS tools. Thats the reason you could still see number of the BI log and other files still begins with two letters “Nq”.


In the Year 2002 Siebel acquired nQuire and renamed NQS tool as Siebel Analytics.


Later in year 2005-06 Oracle acquired Siebel and Siebel Analytics was re-branded as Oracle Business Intelligence (OBI).


Following are major Siebel Analytics & OBIEE releases:

Siebel Analytics Release 7.0
- Siebel Analytics 7.0 – 2002
- Siebel Analytics 7.5 – 2003
- Siebel Analytics 7.7 – 2004
- Siebel Analytics 7.8.2 and 7.8.3 – 2005
- Siebel Analytics / Oracle Business Intelligence 7.8.4 and 7.8.5

OBIEE 10G Releases
- OBIEE 10gR3, 10.1.3.
- OBIEE 10gR3, 10.1.3.2.1
- OBIEE 10gR3, 10.1.3.3.0
- OBIEE 10gR3, 10.1.3.3.1
- OBIEE 10gR3, 10.1.3.3.2
- OBIEE 10gR3, 10.1.3.3.3
- OBIEE 10gR3, 10.1.3.4
- OBIEE 10gR3, 10.1.3.4.1

OBIEE 11G Releases
- OBIEE 11.1.1.3
- OBIEE 11.1.1.5
- OBIEE 11.1.1.6
- OBIEE 11.1.1.7

Friday, 13 November 2015

TRAINING (DW-4) - DATA WAREHOUSE CONCEPTS - Part4 (Star, Snow Flake, Constellation or Mixed Schema)

Schemas

A schema is a collection of database objects, including tables, views, indexes, and synonyms. In a database these database objects (schemas) could be designed variety of ways commonly known as schema models.

In a data warehousing database these schema objects could be organized using below schema models:


1.) STAR Schema
    1. Organizes data into a SINGLE central fact table with surrounding MULTIPLE dimension tables
    2. Each dimension row has many associated fact rows
    3. Dimension tables do not directly relate to each other
    4. All Dimension Tables are de-normalized
    5. Optimized to read data
    6. User friendly ,easy to understand
    7. In OBIEE BMM layer only Star or Mixed Star (combination of more then one star schemas) schemas are used


2.) Snow Flake Schema
    1. Normalized tables are used
    2. Is also called as extended star schema
    3. Two dimensional tables will be directly joined
    4. Like star schema, it has only one fact table

3.) Constellation or Mixed Schema
    1. It contains more than one fact with some common dimensions (Conformed Dimensions)
    2. It is combination of some stars or some snows or both


What are CONFORMED DIMENSION ?

  • A dimension table is shared by two or more facts then it is called as conformed dimension
  • OBIA data model created using conformed dimensions

TRAINING (DW-3) - DATA WAREHOUSE CONCEPTS - Part3 (Dimension Modeling, Fact & Dimension Tables)


DIMENSIONAL MODELING
A Dimensional Model is a database structure that is optimized for online queries and Data Warehousing tools. It is comprised of "FACT" and "DIMENSION" tables. 


DIFFERENT TERMS USED IN DIMENSIONAL MODELING

1.) FACT or MEASURE

A "fact" is a numeric value (analytic number)  that a business wishes to count or sum. For example Total Salary, Quarterly Sales etc.
> An additive numerical value that represents a business metric.
> You can have multiple measures within a fact table.  
> For example, if your fact table is used to track purchases internationally you might have measures for each type of currency.  
If you are building a fact table for the retail industry you might also have measures like cost, list price, average sale price

2.) DIMENSION
A "dimension" is essentially an entry point for getting at the facts. Dimension generally refers to different aspects of a business for example employee, sales, customers etc.

3.) GROUPS (Tables)
Dimension are normally broken down into GROUPS (tables).

4.) ATTRIBUTES (columns)
Dimension are broken down into GROUPS (tables) and they contain several ATTRIBUTES (columns).

5.) DIMENSION TABLE
Provides the description of the FACTS/MEASURES (analytic numbers).
> Used to filter queries and to select data on the basis for example who, what, when, where and why behind the facts.
> H
ave many columns but a limited amount of rows
> Example of Dimension tables are products, employees, customers, time, and location etc.

DESIGNING A DIMENSION TABLE
  • Use a unique identifier integer column that is auto incremental as your PRIMARY KEY.  This is commonly known as a SURROGATE KEY.
  • Use the source’s (OLTP) primary key as an ALTERNATE/BUSINESS KEY.
  • Any additional ATTRIBUTES (columns) that describe the business entity


6.) DIMENSION HIERARCHIES
> Commonly defined as a structure to provide drill up and drill down capabilities.
> For example, in a time dimension you might have two separate hierarchies, one for fiscal year and another for calendar year.  These two dimension could contain the following attributes year, quarter, month, day.

7.) SLOWLY CHANGING DIMENSIONS
In order to handle the data change for data warehouse dimension's attribute, below could be options:

A.) Do nothing (type 0).  
> Not recommended.
> Can not guarantee history preservation 
> Least control over managing changed attributes.

B.) Overwrite old data with new data (type 1)
> Completely overwrites the previous attribute value.  
> Could be ideal for spelling error or the historical value of this column is not crucial. 
> Easiest method to implement but it can be hard to manage.

C.) Create multiple records with different key values (type 2)
> Provides you with the ability to have an unlimited amount of history.  
> Usually implemented by adding a start and end date column.
> If you have to make changes to past records this could require you to also update fact records.

D.) Create a new column for previous values (type 3)
This allows only a fixed amount of history to be retained.  If you create two extra columns for the team attribute you can only store three team values (the current value and last two previous values)

8.) FACT TABLE
> A table that joins dimension tables with measures.  
> Fact tables are huge as compared to dimension tables. Therefore, these tables must be normalized to be efficient.
> A fact table is normalized when it consists of the following two things:
- A composite primary key using the foreign keys to the dimension tables.
- Measure(s) used for numerical analysis.

DESIGNING A FACT TABLE
  • Create a COMPOSITE PRIMARY KEY using foreign keys of Dimension tables.
  • Add an additional column for the measure.
  • For example, To know "time worked" by employees, by location, by project and by task.  If you had a dimension for employees, location, project and task you would create a COMPOSITE PRIMARY KEY using these foreign keys and add an additional column for the "time worked" measure.